


Special offers from our partners!

Find Replacement BBQ Parts for 20,308 Models. Repair your BBQ today.

724-746-5500 | blackbox.com
Page 15
Chapter 4: Using the Tablet Cart
4. Using the Tablet Cart
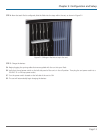
4.1 Loading your iPads into the Tablet Cart
1. Unlock the tambour doors if a padlock (not included) has been added for security.
2. Locate the external power switch on the left side panel of the cart and verify the switch is in the OFF position. To eliminate any
arcing, the power switch should be in the OFF position when iPads are being plugged in and prior to plugging the cart into the
wall receptacle.
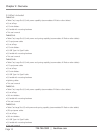
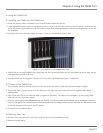
3. Unplug the iPads from their sync cables as shown in Figure 4-1 and distribute to your users.
Figure 4-1. Sync cables in cart unplugged from iPads.
4. When iPads are no longer needed, insert them back into the trays and plug them into the sync cables. Be sure to have the cart
unplugged from the wall at this time.
5. Once all of the iPads are plugged in, plug the cart into a wall outlet designated by your IT professional.
4.2 Power on the Tablet Cart
1. Turn the power switch on the left side panel of the cart to the ON position. iPads will automatically begin charging.
2. To sync your iPads, plug your laptop into the USB port on the right side panel of the cart with the supplied USB cable or
lightning cable.
3. Open iTunes and a list of your iPads will begin to appear on the screen. The iPads must be plugged in to the syncing cables
within the cart for this process to occur.
4. After the spinning icons have disappeared from the iPad list, syncing is complete and the laptop can be unplugged. Once the
laptop is unplugged, the QwikLink system will automatically return to charging mode until you manually turn the power switch
on the left side panel of the cart to the OFF position.
5. Close and lock the tambour doors.
4.3 Moving Your Cart
1. Be sure to turn the power switch OFF and unplug the cart from the wall before moving.
2. Release the caster brakes.