


Special offers from our partners!

Find Replacement BBQ Parts for 20,308 Models. Repair your BBQ today.

7
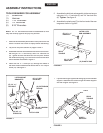
FIGURE 9
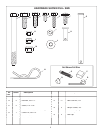
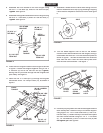
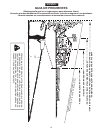
15. Insert four 1/4" x 1" hex bolts (E) with 1/4" fl at washers
(J) down through the tray and the inside holes in the
latch stand plate. Secure the bolts with four 1/4" fl at
washers (J) and 1/4" hex lock nuts (K).
Do not tighten
yet.
See fi gure 9.
16. At this time
tighten
all bolts which were left loose.
FIGURE 10
17. Slide the handle into the channels in the latch stand
plate. Push the handle in all the way against the front of
the tray by depressing the detent buttons in the bottom
of the handle. See fi gure 10.
18. Assemble a 1/4" lock washer (I) and then a 1/4" fl at
washer (J) onto each of the two 1/4" x 1/2" screws (D).
Assemble the screws (D) into the small holes at each
end of the handle. See fi gure 10.
FIGURE 11
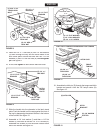
CART WITH TONGUE ARRANGED FOR TOWING
FIGURE 12
19. Assemble the hitch pin (R) through the tongue and hitch
bracket and secure it with the 1/8" hairpin cotter (N).
See fi gure 12.
ENGLISH
HITCH
BRACKET
(N) 1/8" HAIRPIN
COTTER
(R) HITCH PIN
(E) 1/4" x 1"
HEX BOLT
(J) 1/4" FLAT
WASHER
(K) 1/4" HEX
LOCK NUT
LATCH
STAND
PLATE
(J) 1/4" FLAT
WASHER
FIGURE 8
(L) 5/16" HEX
LOCK NUT
(F) 5/16" x 3/4"
TRUSS HEAD
BOLT
(E) 1/4" x 1"
HEX BOLT
(J) 1/4" FLAT
WASHER
(K) 1/4" HEX
LOCK NUT
FRONT
TONGUE
(G) 3/8" x 4"
CLEVIS PIN
(H) 3/8" x 1"
CLEVIS PIN
LATCH LOCK
(J) 1/4" FLAT WASHER
(I) 1/4" LOCK WASHER
(D) 1/4" x 1/2" SCREW
DETENT BUTTON
HANDLE
BOTTOM OF CART