


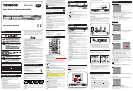
REAR PANEL
SAFETY
To ensure proper use of this product, please read this instruction manual carefully
and retain for future reference. Should the unit requires any maintenance, please
contact an authorized service center.
Instruction Manual
(3) Speaker Connection
Before Connecting
This DVD Home Cinema System is designed to reproduce optimum sound quality
when the supplied speakers are used. If you wish to connect other speakers to the
system instead of the supplied speakers, they should be 4 ohms impedance for the
speakers and 3 ohms impedance for subwoofer.
Ensure correct polarity when connecting speakers (colored wire for matched colour
terminal clip).
To prevent damage to circuits, never short-circuit the speaker output terminals.
Placement of speakers play an important role in the reproduction of surround
sound effect.
Particular attention should be taken when designing the speaker layout. For
the best surround effects, all speakers should be installed.
TV
Front
speaker
(left)
Front
speaker
( right )
VIEWING AREA
Subwoofer
Center Speaker
Rear speaker
( right surround )
Rear speaker
( left surround )
TV
Front
speaker
( left )
Front
speaker
( right )
DIM L
Subwoofer
Center Speaker
Rear speaker
( right surround )
Rear speaker
( left surround )
DIM C
DIM R
DIM RSDIM LS
1) Please place the front left and right speakers to the left hand side and right hand
side of your TV.
2) Place the center speaker above the TV so that the centre channel sound is
localised.
3) Place the suround left and surround right speakers in line with your listening
position or behind your listening position. Ideally they should be placed slightly
above your ear level while you seat in your normal listening location.
4) The subwoofer can be installed for powerful bass sounds when it is placed on
the floor. Place the subwoofer on the floor near the TV.
5) All speakers should approximately be at the same distance from your listening
position and must be visible.
SPEAKER PLACEMENT
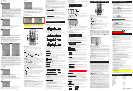
FRONT PANEL
IMPORTANT !
Connect the AC cord only after the speakers, antenna and all optional
equipment have been connected.
Never make or change any connections with the power switched on.
The rating plate is located at the rear panel of the system.
1. FM Antenna Input Connection
For FM reception, connect the FM antenna to the FM jack. Move the antenna in
various directions until the clearest signal is received.
Note: Position the antenna as far away as possible from a TV, VCR or other
radiation source.
2. AUX IN (AUDIO)
For connecting audio (Left / Right) input signals from auxiliary source such as
VCR, TV or Satellite Receiver and playing them through this unit. These
connections are selected by the [SOURCE] button on the front panel or [AUX/
TV/FM] key on the remote control.
3. TV SCART OUT / TV IN (AUDIO)
Use the scart cable to connect the unit TV SCART OUT jack to the corresponding
Scart input jacks on the TV.
In DVD Mode :
DVD signal will be output through this jack to the TV.
In TV IN Mode :
Audio signal will be input through this jack from the TV to the DVD Home
Cinema System. This audio sound will be amplified to the speakers.
4. Subwoofer Speaker
For connecting the subwoofer to SUB terminal. Connect the purple colour
terminal clip to the subwoofer purple colour wire and black terminal clip to the
subwoofer black wire.
5. Center Speaker
For connecting the center speaker to C terminal. Connect the green colour
terminal clip to the speaker green colour wire and black terminal clip to the
speaker black wire.
6. Surround Speaker (Rear Speakers)
For connecting the surround left speaker to SL terminal. Connect the blue
colour terminal clip to the speaker blue colour wire and black terminal clip to the
speaker black wire.
For connecting the surround right speaker to SR terminal. Connect the grey
colour terminal clip to the speaker grey colour wire and black terminal clip to the
speaker black wire.
7. Front Speaker
For connecting the front left speaker to FL terminal. Connect the white colour
terminal clip to the speaker white colour wire and black terminal clip to the
speaker black wire.
For connecting the front right speaker to FR terminal. Connect the red colour
terminal clip to the speaker red colour wire and black terminal clip to the speaker
black wire.
8. Power Cord
1. On / Standby
2. Standby Indicator
3. Disc Tray
4.
/ 1) Open or close the disc tray in stop or no disc mode. 2) Stop playing.
5.
/ VOL 1) Increase volume. 2) Decrease volume.
6. LED Display Area
7. Infra-Red Receiver Window
8.
FREQUENCY 1) Skip to the previous chapter / track in DVD / VCD / CD
mode. 2) Tune the channel number down in tuner mode.
9.
FREQUENCY 1) Skip to the next chapter / track in DVD / VCD / CD mode.
2) Tune the channel number up in tuner mode.
10.
Play button.
11. SOURCE Switch different input sources between AUX 1, AUX 2, TV IN, Tuner
and DVD.
12.USB Jack for external USB device connection.
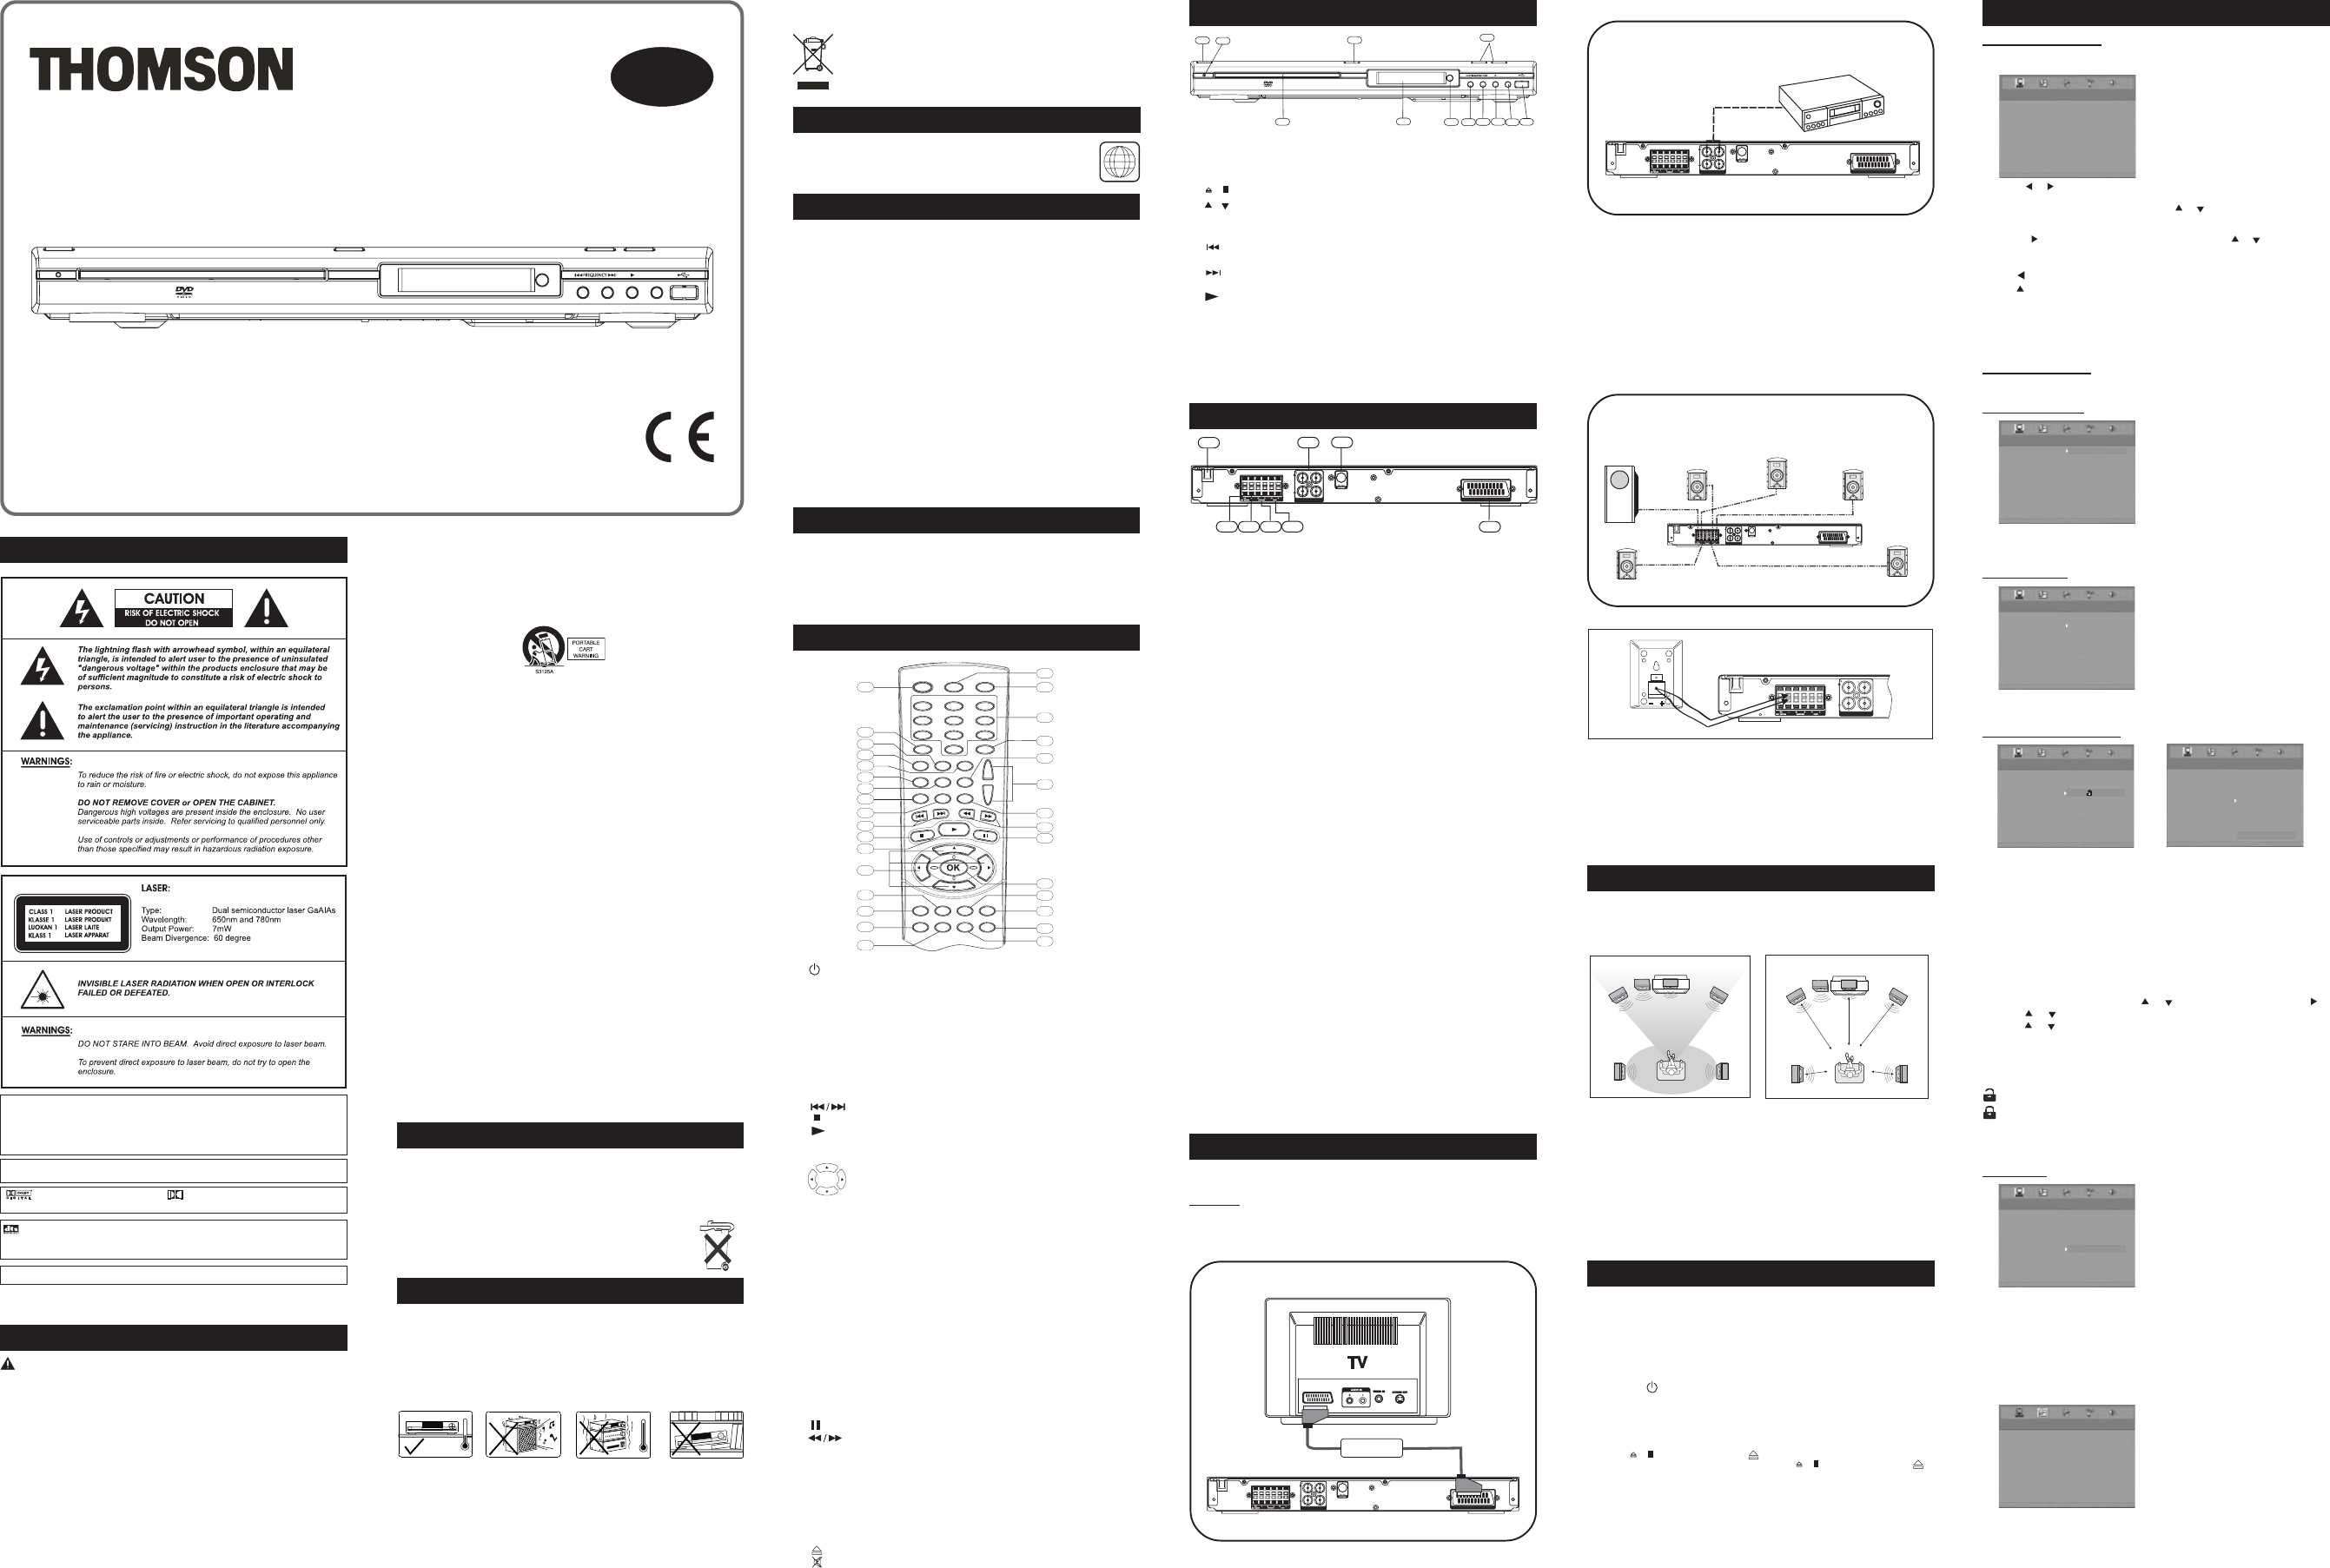
1.
ON / STANDBY Turn unit between Operating or Standby mode.
2. GOTO Display INFO Menu. Direct key in the specific location on a DVD / CD /
VCD / SVCD disc to play.
3. BOOKMARK Open Bookmark Menu.
4. V-SELECT Switch TV RGB on and off.
5. SUBTITLE Toggle between different subtitle.
6. A-B Set the repeat A-B playback. Or clear the programmed repeat playback.
7. PLAYMODE Display Playmode Menu for different play modes operation.
8. ZOOM / CLEAR 1) Select different zooming size while playing video disc by
pressing it repeatedly. 2) Clear the information you input in other setup menu.
9. ANGLE / PBC 1) Toggle different Angles to diplay if present on disc. 2) Turn
PBC ON/OFF for VCD disc.
10.
Skip backward / forward to the previous or next chapter / track.
11.
Stop playing.
12.
Start playing.
13. 1) Active Navigation Keys
Navigate in indicated directions for making selections in menus,
Active Navigation mode or tuner setting.
2) Tuning Keys (In Tuner Mode)
UP / DOWM to change the frequency of the Radio Channel.
LEFT / RIGHT to change the Radio Channel.
14.DVD 1) Select DVD mode. 2) If you connect your USB device to the USB jack
on the front panel, press this button and use Active Navigation keys to select
USB mode.
15.AUX/TV/FM Toggle between AUX 1, AUX 2, TV IN and Tuner mode by pressing
repeatedly.
16.SURROUND Select different surround sound effects among STEREO,
PROLOGIC II MOVIE, PROLOGIC II MUSIC, CONCERT, CHURCH, PASSIVE,
WIDE and LIVE.
Note: Surround Sound Effect (DSP) is available only for STEREO contents (2
channels). DSP cannot be selected while playing back a DVD with multichannel
audio content like Dolby Digital 5.1 or DTS 5.1.
17.SLEEP Activate a sleep timer for the unit to the standby mode automatically.
18.TONE Select different EQ modes among FLAT, ROCK, POP, CLASSIS and
JAZZ.
19.SETUP / EXIT Press to enter or exit the SYSTEM SETUP Menu.
20.MENU Enter the Disc Contents Menu in DVD mode or Return disc menu for VCD
disc with PCB ON mode.
21.EX BASS Turn EX BASS to Soft Bass, Balance Bass or Powerful Bass.
22.OK Enter or select in menu and setup navigation.
23.
Freezes picture and sound during playback.
24.
Start backward / forward search.
25.TITLE / ROTATE 1) Display the Title Menu if present on disc (DVD mode only).
2) Rotate picture when playing picture CDs.
26.- VOL + Increase or decrease the volume.
27.AUDIO / FM ST 1) Change different audio stream of disc. 2) Select Mono / Stereo
in Tuner mode.
28. INFO Display current setting information of the playing disc.
29. 0 - 9 (Numeric Keys) 1) In DVD mode, they are used for direct key in selections
of title, chapter, track, channel and time search input. 2) In tuner mode, they are
used to direct key in a preset station.
30.
OPEN/CLOSE Open or close the disc tray.
31.
MUTE Mute and unmute the sound output.
1
2
3
4
5
27
6
7
10
13
16
17
18
19
21
20
22
24
23
25
28
26
30
31
15
14
8
9
29
11
12
REMOTE CONTROL
The following connections show the different video and audio connections to TV,
VCR or CD Recorder.
Important : Make sure that the AC Voltage matches your local voltage.
Connect the AC cord only after the speakers, antenna, and all optional
equipment have been connected.
(1) Connecting TV
CONNECTIONS
Press the speaker terminal clip down & insert the wire, then release the clip.
Connection of all speakers are the same.
Note :
• Do not remove excessive amount of insulation on the wire cords to avoid the
stripped portion from touching each other. The optimal length for the stripped
part should be around 1/3 inch (or 1cm).
• Do not push the stripped part too far into the speaker connectors.
• Do not connect more than one speaker to any one pair of speaker terminals.
• Do not connect speakers with an impedance lower than the speakers supplied.
GETTING START
Before Beginning
• Finish the connection for the DVD Home Cinema System as shown in the
previous section.
• Connect Power to the DVD Home Cinema System.
• Turn on the TV and set to the correct video-in channel.
• Insert the batteries in the remote control.
Start Playback
• Press the key (either on the unit front panel or the remote control). The
unit display should light.
• Press DVD on the remote control, the unit will switch to the DVD mode.
After a few seconds the panel will show [NO DISC].
• Press
/ on the front panel or on the remote control. The disc tray
will open. Place a DVD in dic tray and press
/ on the front panel or
on the remote control (same as disc tray open operation). The disc tray will
be closed. The unit will start reading the disc and start playing it. Before
the movie starts to play, a menu will be displayed. You need to select the
item [PLAY MOVIE] and press OK to start the movie playback.
• Although you can watch a movie immediately, to get the best result from this
unit, you are suggested to proceed for the Basic setup options first. Detail
description is on the following pages. This will set up all the functions on
your unit. You only need to do it once while you first install your Home
Cinema Unit.
IMPORTANT SAFETY INSTRUCTIONS
CAUTION : RETAIN THIS MANUAL FOR FUTURE REFERENCE
This unit has been designed and manufactured to assure personal safety.
Improper use can result in electric shock or fire hazard. The safeguards
incorporated in this unit will protect you if you observe the following
procedures for installation, use and servicing. This unit does not contain
any parts that can be repaired by the user.
• Read these instructions.
• Keep these instructions.
• Heed all warnings.
• Follow all instructions.
• Do not use this apparatus near water.
• Clean only with dry cloth.
• Do not block any ventilation openings. Install in accordance with the manufacturer
instructions.
• Do not install near any heat sources such as radiators, heat registers, stoves
or other apparatus (including amplifiers) that produce heat.
• Do not defeat the safety purpose of the polarized or grounding-type plug. A
polarized plug has two blades, one wider than the other. A grounding type plug
has two blades and a third grounding prong. The wide blade or the third prong
is provided for your safety. If the provided plug does not fit into your outlet,
consult an electrician for replacement of the obsolete outlet.
• Protect the power cord from being walked on or pinched particularly at plugs,
convenience receptacles and the point where they exit from the apparatus.
• Only use attachments / accessories specified by the manufacturer.
• Unplug this apparatus during lightning storms or when unused for long periods
of time.
• Use only with a cart, stand, tripod, bracket or table specified by the manufacturer,
or sold with the apparatus. When a cart is used, use caution when moving the
cart / apparatus combination to avoid injury from tip-over.
• Refer all servicing to qualified service personnel. Servicing is required when
the apparatus has been damaged in any way, such as when the power supply
cord or plug is damaged, liquid has been spilled or objects have fallen into the
apparatus, the apparatus has been exposed to rain or moisture, does not operate
normally, or has been dropped.
• Apparatus shall not be exposed to dripping or splashing and that no objects
filled with liquids, such as vases, shall be placed on the apparatus.
• Burden
Do not place a heavy object on, or step on the product. The object may fall,
causing serious personal injury and serious damage to the product.
• Damage Requiring Service
Unplug this product from the wall outlet and refer servicing to qualified service
personnel under the following conditions :
A) When the power supply cord or plug is damaged.
B) If liquid has been spilled or objects have fallen into the product.
C) If the product has been exposed to rain or water.
D) If the product does not operate normally by following the operating instructions.
Adjust only those controls that are covered by the operating instructions. Improper
adjustment of other controls may result in damage and will often require extensive
work by a qualified technician to restore the product to its normal operation.
E) If the product has been dropped or damaged in any way.
F) When the product exhibits a distinct change in performance. It indicates a
need for service.
• Servicing
Do not attempt to service this product yourself as opening or removing cover
may expose you to dangerous voltage or other hazards. Refer all servicing to
qualified service personnel.
• Replacement Parts
When replacement parts are required, be sure the service technician has used
replacement parts specified by the manufacturer or have the same characteristics
as the original part. Unauthorized substitutions may result in fire, electric shock
or other hazards.
• Safety Check
Upon completion of any service or repairs to this product, ask the service
technician to perform safety checks to determine that the product is in proper
operating condition.
• The main plug is used as the disconnect device, the disconnect device
shall remain readily operable condition.
• Stand-by light will be on when the main plug is connected.
Stand-by light will be off when the main plug is disconnected to the socket.
• European versions comply with CE requirements.
To view the video from DVD disc on your TV set, connect the TV SCART OUT jack
of this unit to the SCART jack of your TV set using a scart cable.
DPL914VD
EN
2. LANGUAGE SETUP
You can select different languages for OSD shown on TV screen Setup Menu
operation. You can also select different lanuages for Audio, Subtitle and Menu
which are recorded on the DVD disc.
LANGUAGE SETUP
OSD LANG
AUDIO LANG
SUBTITLE LANG
DISC MENU
EXIT SETUP
OSD LANG : Select the unit All Setup Menu language.
AUDIO LANG : Select the audible language to play.
SUBTITLE LANG : Select the subtitle displayed on the TV screen.
DISC MENU : Select the disc menu language.
Note : If the selected language is not recorded on the disc, the disc own fault
language is selected automatically.
BASIC SETUP
Basic Operation
1. Press remote control SETUP / EXIT button to enter the System Setup Menu in
stop mode. To exit the System Setup Menu, press SETUP / EXIT again.
2. Press
or to navigate for different Setup Menu : System Setup, Language
Setup, Audio Setup, Video Setup or Speaker Setup.
3. When any Setup Menu is high-lighted, use
or to select different items under
the setup menu. Then different options for each item will appear on the right
column.
4. Use the
or OK to enter into the right column. Then use or to change a new
setting. Press OK to confirm the changed setting.
5. Repeat step 3 to 4 to change the other settings.
6. Use
button to return to the previous menu.
7. Use
button to return to the main menu bar.
8. Repeat step 2 to 7 to change all settings. For detail, please refer to the
corresponding chapters under Setting Details Section described below.
9. If you have finished the changes, highlight the selection EXIT SETUP and
press OK or press SETUP / EXIT again to exit Setup Menu.
Setting Details
1. SYSTEM SETUP
1.1 SCREEN SAVER
SYSTEM SETUP
DIVX[ R ] VOD OFF
PASSWORD
RATING
SOURCE
EXIT SETUP
SCREEN SAVER ON
Turn the screen saver option ON or OFF. If you turn the screen saver ON, the screen
saver image appears when you leave the system in pause or stop mode more than
3 minutes. This saver can protect the TV screen from being damaged.
1.2 DIVX [R] VOD
SYSTEM SETUP
SCREEN SAVER REGISTER CODE
PASSWORD VISIT WEB SITE
RATING
SOURCE
EXIT SETUP
DIVX[ R ] VOD DTYNVU7T
WWW.DIVX.COM / VOD
Shows the DivX code in the DVD Home Cinema System.
Note: The DivX code is varied
1.3 PASSWORD and RATING
SYSTEM SETUP
SCREEN SAVER
DIVX[ R ] VOD
RATING
SOURCE
EXIT SETUP
PASSWORD - - - -
SYSTEM SETUP
SCREEN SAVER 1 KID SAFE
DIVX[ R] VOD 2 G
PASSWORD 3 PG
4 PG13
SOURCE 5 PG-R
6R
7 NC-17
EXIT SETUP
RATING
8 ADULT
Many DVD movie discs contain Motion Picture Assotion rating codes. This Home
Cinema System will recognize the codes on these disc. The unit provides a
method for you to prevent children from viewing films which are not suitable or
objectionable.
1 KID SAFE : Only DVD software intended for child can be played back.
2 G : General Audience, recommended as an acceptable for views of all agees.
3 PG : Parental Guidance suggested.
4 PG13 : Material is not suitable for children under age 13.
5 -- 6 R : Recomend that parents restrict children under 17 from viewing or allow
to view only when superivised by a parent or adult guardian.
7 NC-17 : Not recommended viewing for children under age 17.
8 : Should be viewed only by adults due to graphic sexual material, violence or
language.
1. In SYSTEM SETUP menu, press
or to highlight Rating, then press .
2. Press
or to highlight a rating level for the disc inserted and press OK.
3. Press
or to highlight Password and press OK. Use the numeric key (0-9)
to enter the four-digit password.
If you make a mistake before pressing OK, press the CLEAR button and enter your
4-digit security code again.
DVD discs that are rated above the level you selected will not play unless you enter
correct four-digit password.
Indicates Parental lock is NOT active.
The Parental lock is active.
Note :
1. Only when the parental lock is active the rating level will function.
2. Only when the parental lock is not active the rating level can be changed.
1.4 SOURCE
SYSTEM SETUP
SCREEN SAVER
DIVX[ R ] VOD
PASSWORD
RATING
USB
EXIT SETUP
SOURCE DISC
Select the source files that you want to play bewteen Disc and USB. To access
files in a USB device, make sure your USB devices is connected to the USB jack
on the front panel.
SOURCE
SOURCE
2
3
4
8
5
7
6
10
9
11
1
12
PACKING
Examine the contents of the box of the DVD Home Cinema System :
• DVD Home Cinema System with attached power cord
• Remote Control with 2 batteries
• Instruction Manual
• FM Antenna • 2 Rear Speaker with wire
• 2 Front Speakers with wire • Subwoofer with wire
• Center Speaker with wire • Warranty Card
(2) Connecting VCR or Satellite Receiver (Optional)
To listen the sound from your VCR, TV or Satellite Receiver throngh the speakers
of this unit, only connect the Left / Right audio output of these equipments to the
Left / Right audio input jack of this unit.
INSTALLATION
• Install your unit on a stable flat surface. There must be sufficient room in front
of the unit for the drawer to be opened and the unit should be positioned so that
it can see the remote control.
• Do not expose your unit to extremes of temperature or humidity.
• Avoid standing it on a hot surface such as on top of other hot running equipment
and ensure that there is adequate ventilation to the unit.
CAUTION !
Do not install this unit in confined space such as a book case or similar
environment .
Cleaning Disc
Picture freezing, sound skipping or repeating can occur if the disc inside the player
is dirty.
• When a disc becomes dirty, clean it with a cleaning cloth. Wipe the disc from
the center out.
• Do not wipe in a circular motion. Circular scratches can cause picture distortion
or render the disc unplayable.
CAUTION !
Do not use solvents, commercially available cleaners, or antistatic spray intended
for analog disc.
PLAYER ZONES
DVD disc are programmed with region numbers indicating countries
in which they can played. The region number of this unit is 2. If the
DVD disc is marked with a different region number, it cannot be played
on this unit.
2
• DVD-Video
• DVD-R/RW, DVD+R/RW
DVD-R and DVD-RW discs must be made in Video DVD mode. DVD+RW disc
must be made in accordance with the specifications for DVD+RW disc with
a 4.7 GB capacity.
• Video CD (VCD), Super Video CD (SVCD)
• Audio CDs
• CD-R/RW
This player can play most CD-R/RW discs. However depending on the recording
conditions, you may find that not all discs will play successfully.
• MP3 Files on CD-R/RW
MP3 files should be ISO 9660 or JOLIET format. If the sampling frequency is
44.1 or 48.1KHz, and the fixed bit rate is 128Kbps or higher, MP3 files can be
played. However, some of them may not be played depending on their conditions
or formats.
• WMA Files on CD-R
If the sampling frequency is 32KHz, and the fixed bit rate is 128Kbps or higher,
WMA files can be played. However, some of them may not be played depending
on their conditions or formats.
• JPEG Files on CD-R/RW
This player can play JPEG files with a resolution for up to five million pixels.
Certain JPEG files cannot be read by this player.
• MPEG4 Files on CD-R/RW
Your MPEG4 files should be ISO format without QPEL.
• DivX Files on CD-R/RW
PLAYABLE DISCS
IMPORTANT BATTERY INFORMATION
Your THOMSON product is designed and manufactured with high quality
materials and components which can be recycled and reused.
This symbol means that electrical and electronic equipment, at their
end-of-life, should be disposed of separately from your household waste.
Please, dispose of this equipment at your local community waste
collection/recycling centre.
In the European Union there are separate collection systems for used
electrical and electronic product.
Please, help us to conserve the environment we live in!
This product incorporates copyright protection technology that is protected by
U.S. patents and other intellectual property rights. Use of this copyright protection
technology must be authorized by Macrovision, and is intended for home and
other limited viewing uses only unless otherwise authorized by Macrovision.
Reverse engineering or disassembly is prohibited.
U.S. Patent Nos. 4,631,603; 4,819,098; 4,907,093; 5,315,448; and 6,516,132.
• When storing the unit, be sure to remove the battery because they may leak
and damage the unit.
• Battery may leak electrolyte if inserted incorrectly, if disposed of in fire, or if
an attempt is made to charge a battery not intended to be recharged.
• Discard leaky battery immediately. Leaking battery may cause skin burns or
other personal injury.
• Dispose of battery, according to federal, state and local
regulations in place.
Please Respect the Environment!
• Before throwing any battery away, consult your distributor who may
be able to take them back for specific recycling.
SYSTEM SETUP
SCREEN SAVER
DIVX[ R ] VOD
PASSWORD
RATING
SOURCE
EXIT SETUP
Manufactured under license from Dolby Laboratories. “Dolby” ,”Pro Logic”and the
double-D symbol are trademarks of Dolby Laboratories.
Dolby and the double-D symbol are trademarks of Dolby Laboratories.
Manufactured under license from Dolby Laboratories.
DTS is a digital sound compression technique developed by Digital Theater
Sound Systems for digital multichannel audio signals. “DTS” and “DTS Digital Out”
are trademarks registered by Digital Theater Systems Inc.
Pack Home Cinema with DVD
1
3
8
6
5
7
4
2
TV SCART OUT/ TV IN (AUDIO)
AUX IN (AUDIO)
TV SCART OUT/ TV IN (AUDIO)
AUX IN (AUDIO)
Audio cable
VCR, TV or Satellite Receiver.
Play
1
FRONT LEFT
SPEAKER
2
FRONT RIGHT
SPEAKER
4
SURROUND
LEFT SPEAKER (Rear)
5
SURROUND
RIGHT SPEAKER (Rear)
3
CENTER
SPEAKER (Front)
SUBWOOFER
(Can be placed
anywhere in the room)
TVSCART OUT / TV IN (AUDIO)
AUXIN (AUDIO)
AUX IN (AUDIO)
TV SCART OUT/ TV IN (AUDIO)
AUX IN (AUDIO)
SCART CABLE
SCART IN