


Special offers from our partners!

Find Replacement BBQ Parts for 20,308 Models. Repair your BBQ today.
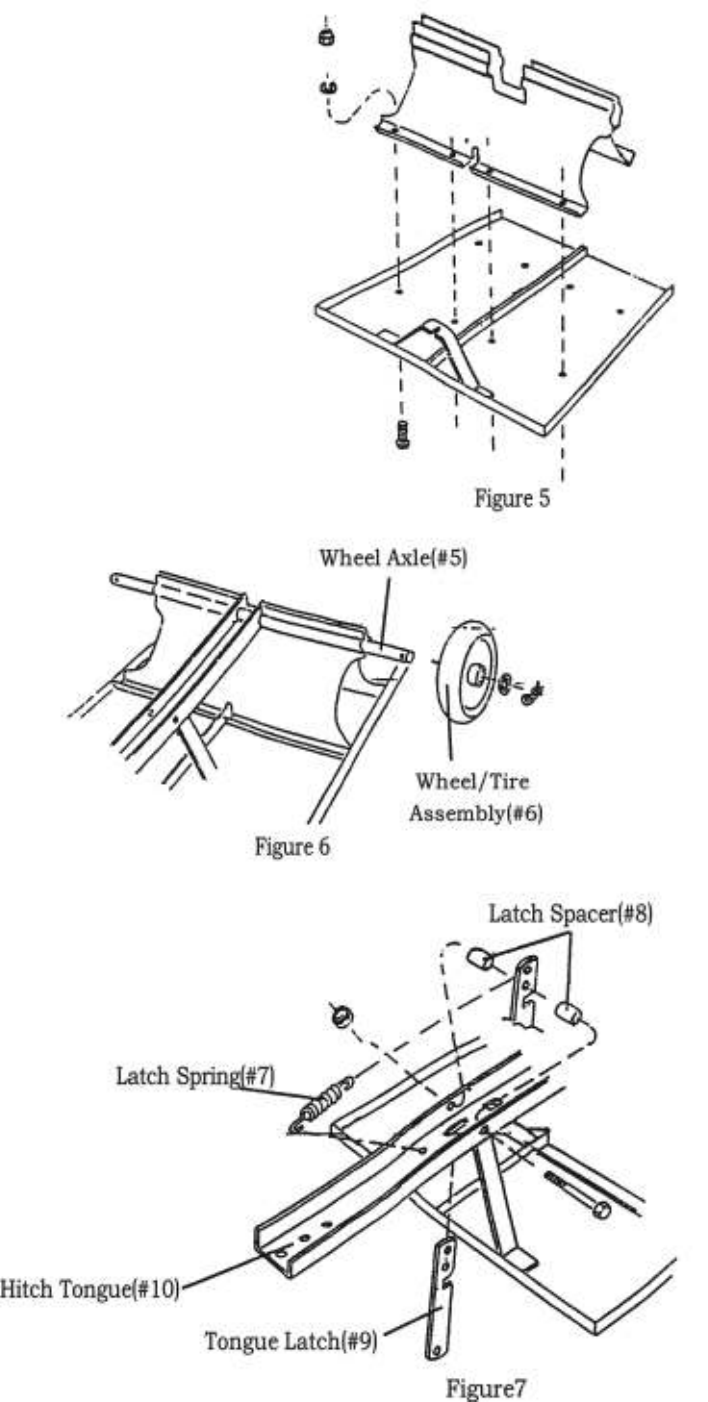
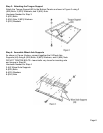
Step 6: Attaching Wheel Axle and Tires
Set Hitch Tongue(#10) in place as shown below before inserting
Wheel Axle(#5) through Wheel Axle Support(#4). Next, insert the
Wheel Axle (#5) into the Wheel Axle Support(#4), and through the
holes in the Tongue(#10) as shown in Figure 6. Be sure equal
amounts of axle extend from each side of Wheel Support.
TIGHTEN BOLTS ON WHEEL AXLE
SUPPORT.
Next, install each Tire Assembly (#6) onto
Wheel Axle, followed by a Washer(#26)
and a Cotter Pin(#27)
Hardware Needed for Step 6:
1 (#10) Hitch Tongue
1 (#5) Wheel Axle
2 (#6) Wheel Assemblies (Tires)
2 (#26) Washers
2 (#27) Cotter Pins
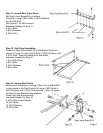
Step 7: Assembling Tongue Latch
Insert the Tongue Latch(#9) up through the opening in
the Hitch Tongue(#10). Place one Latch Spacer(#8)
on each side of the Tongue Latch(#9), the insert
Bolt(#29) to connect Hitch Tongue(#10) and Latch
Spacers(#8) and Tongue Latch(#9). Only Hand
Tighten (#29) Bolt to (#30) Nut. See Figure 7.
Next, attach one end of Latch Spring(#7) to Hitch
Tongue(#10) and one end of Latch Spring(#7) to top
hole in Tongue Latch(#9). Note hole locations from
Figure 7. Now completely tighten (#29) Bolt and (#30)
Nut.
Hardware Needed for Step 7:
1 (#9) Tongue Latch
2 (#8) Latch Spacers
1 (#7) Latch Spring
1 (#29) Bolt
1 (#30) Nut
Page 7
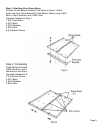
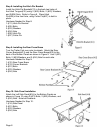
Step 5: Attaching Wheel Axle Supports
To Bottom Panels
Attach Wheel Axle Supports (#4) to the Bottom Panels as
shown in Figure 5 to the right, using 4 (#21) Bolts per side.
Next, finish bolting together two middle connections of Bottom
Panels after Wheel Axle Support is in place. Using 2 (#21) Bolts,
2 (#23) Washers, and 2 (#24) Nuts.
Hardware Needed for Step 5:
2 (#4) Wheel Axle Supports (connected)
10 (#21) Bolts
10 (#23) Washers
10 (#24) Nuts