


C. Using the built-in battery
The unit has a built-in, non-replaceable, rechargeable battery. Charge the built-in battery before using it for the
rst time. The normal charging time should be completed within 4-5 hours. The charging light will go out when
the built-in battery becomes fully charged.
To recharge the built-in battery
Turning on the unit
1. Slide the CHARGE / STANDBY / ON switch on the left side of the unit to the ON
position.
2. The start-up picture will appear on the screen.
3. After use, slide the CHARGE / STANDBY / ON switch to the STANDBY (power o)
position.
1. Read these instructions.
2. Keep these instructions.
3. Heed all warnings.
4. Follow all instructions.
5. Do not use this apparatus near water.
6. Clean only with a dry cloth.
7. Do not block the ventilation openings. Install in
accordance with the manufacturer's instructions.
8. Do not install near any heat sources such as
radiators, heat registers, stoves, or other apparatus
(including ampliers) that produce heat.
9. Do not defeat the safety purpose of the
polarized or grounding - type plug. A polarized
plug has two blades with one wider than the
other. A grounding type plug has two blades
and a third grounding prong. The wide blade or
the third prong are provided for your safety. If
the provided plug does not fit into your outlet,
consult an electrician for replacement of the
obsolete outlet.
10. Protect the power cord from being walked on
or pinched particularly at plugs, convenience
receptacles, and the point where they exit from
the apparatus.
11. Only use attachments/accessories specified by
the manufacturer.
12. Use only with a cart, stand, tripod,
bracket, or table specified by the
manufacturer, or sold with the
apparatus. When a cart is used,
use caution when moving the cart/apparatus
combination to avoid injury from tip-over.
Cautions:
• Usetheprovided12Vcarpoweradapteronly.Usewithothercarpoweradapterscoulddamagetheunit.
• The12Vcarpoweradapterincludedwiththisunitisforitsuseonly.Donotuseitwithotherequipment.
• Intheinterestoftracsafety,donotoperatethisunitorviewvideoswhiledrivingavehicle.
• Makesuretheunitissecurelyfastenedtopreventitfromfallingoryingthroughtheairintheeventofan
accident.
• Whentheinsideofthecigarettelightersocketisdirtywithashesordust,theplugsectionmaybecome
hot due to poor contact. Be sure to clean the cigarette lighter socket before use.
• Afteruse,disconnectthe12Vcarpoweradapterfromboththeunitandcigarettelightersocket.
To DC IN 9V-12V Jack
2
Car power adapter
To cigarette
lighter socket
1
B. Using the car power adapter
Warning:
Disconnect the car power
adapter when not in use.
Notforusein24Vvehicles.
13. Unplug this apparatus during lightning storms or
when unused for long periods of time.
14.Referallservicingtoqualiedservicepersonnel.
Servicingisrequiredwhentheapparatushas
been damaged in any way, such as power-supply
cordorplugisdamaged,liquidhasbeenspilled
or objects have fallen into the apparatus, the
apparatus has been exposed to rain or moisture,
does not operate normally, or has been dropped.
A. Using the AC power adapter
Cautions:
• TheACpoweradapterincludedwiththisunitisforitsuseonly.Donotuseitwithotherequipment.
• Whentheunitisnotgoingtobeusedforlongtime,disconnecttheACpoweradapterfromtheACpoweroutlet.
• WhentheACpoweradapterispluggedin,theapparatusisnotcompletelydisconnectedfromthemain
power supply, even when the power is turned o.
Notes:
• Whenthebuilt-inbatterypowerislow,"BatteryLow"willdisplayonthescreenandtheunitwillstopplaying.
• Rechargethebuilt-inbatterywhenyouarereadytouseitagain.
• Whileusingthebuilt-inbattery,theenvironmentaltemperatureshouldbe41°F(5°C)to95°F(35°C).
• Togetthelongestservicelifeofthebuilt-inbattery,chargeatindoor-temperature.
• Thebuilt-inbatteryinthisdevicemaypresentariskoffireorchemicalburnifmistreated.Donot
disassemble, heat above 212
o
F (100
o
C), or incinerate.
• Theunitshouldnotbeexposedtoexcessiveheatsuchassunshine,reorthelike.
• Whendiscardingtheunit,environmentalproblemsmustbeconsideredandlocalrulesorlawsgoverning
the disposal of such products must be strictly followed.
Warnings:
• Thebuilt-inbatterycanonlyberechargedwhentheunitisinCHARGEmodewhileusingtheACpower
adapter.
• Thebuilt-inbatterycannotberechargedwhentheunitisinONmode.
• DoNOTrechargethebuilt-inbatteryinavehicleusingthecarpoweradapter.
• Batteries should not be exposed to excessive heat such as sunshine, re or the like.
The unit can playback
Region management information
RegionManagementInformation:ThisunitisdesignedandmanufacturedtorespondtotheRegion
ManagementInformationthatisencodedonDVDs.IftheregionnumberprintedontheDVDdoesnot
correspond to the region number of this unit, it cannot play that disc.
The region number of this unit is 1.
Notes on unauthorized discs
YoumaynotbeabletoplaysomeDVDsonthisunit,particularlyiftheywerepurchasedfromoutsideyour
geographic area or made for business purposes.
DVDs
[8cm/12cm disc]
Compatible
Audio CDs
[8cm/12cm disc]
Disc function or operation that is not available
When the symbol appears on the screen, it indicates the function or operation attempted is not available at that
time.ThisoccursbecausetheDVDmanufacturerdeterminesthespecicfunctionsofDVDs.Certainfunctionsmay
notbeavailableonsomeDVDs.BesuretoreadthedocumentationprovidedwiththeDVD.
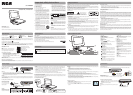
IconsusedonDVDs
Sample lcons
Note:
WhenplayingbackaCD-G(Graphics)orCD
EXTRAdisc,theaudioportionwillbeplayed,
but the graphic images will not be shown.
Languageselectionsforaudio
Languageselectionsforsubtitles
Screen aspect ratio
Multiplecameraangles
Region code indicator
1
Title, chapter and tracks
• DVDsaredividedinto“titles” and “chapters”. If the disc
has more than one movie on it, each movie would be a
separate “title”. “Chapters” are sections of titles.
• AudioCDsaredividedinto“tracks”. A “track” is usually
one song on an Audio CD.
Note: Numbersidentifyeachtitle,chapter,andtrackonadisc.Mostdiscshavethesenumbersrecordedon
them, but some do not.
Please check and identify the supplied accessories.
AC Power Adapter.......................................................................................................................................................................x 1
Car Power Adapter......................................................................................................................................................................x 1
1
To AC power
outlet
2
To DC IN
9V-12V jack
3
Slide the switch
to CHARGE
4
Charging
light ON
5
Recharging is completed
when charging light goes
out
AC power
adapter
Disc formats
user manual
Read these instructions before using your new product for the rst time.
DRC6327EC / DRC6327EL
Important safety instructions
Safety precautions
* SEE BOTTOM OF UNIT FOR GRAPHIC SYMBOLS *
WARNING:
Should any trouble occur, disconnect the AC power
adapterandreferservicingtoaqualiedtechnician.
The lightning flash with an arrowhead
symbol,withintheequilateraltriangle,is
intended to alert the user to the presence of
uninsulated"dangerousvoltage"withintheproduct's
enclosure that may be of sufficient magnitude to
cause an electric shock.
Theexclamationpointwithintheequilateral
triangle is intended to alert the user to
the presence of important operating and
maintenance (servicing) instructions in this owner’s
manual.
Accessories
Control reference guide
Power supply
AC power adapter
2
1
To DC IN 9V-12V Jack
To AC power outlet
Warning:
The AC/DC adapter is used as a disconnect device and it should remain readily operable during intended use. In
order to disconnect the apparatus from the mains completely, the AC/DC adapter should be disconnected from
the outlet completely.
The12Vcarpoweradapter
allows the unit to be used
with vehicles that have
a12V,negativeground
electrical system.
The supplied AC power
adapter operates on AC
120V.
AVCMultimedia
Markham,OntarioL3R1E3
http://www.RCAav.com
This product contains a
low power laser device.
THIS CLASS B DIGITAL APPARATUS COMPLIES WITH CANADIAN ICES-003.
WARNING: TOREDUCETHERISKOFELECTRICSHOCK,DONOTREMOVECOVER(ORBACK).NOUSER-
SERVICEABLEPARTSINSIDE.REFERSERVICINGTOQUALIFIEDSERVICEPERSONNEL.
WARNING: TOPREVENTFIREORSHOCKHAZARD,DONOTEXPOSETHISAPPLIANCETORAINORMOISTURE.DO
NOTPLACEOBJECTSFILLEDWITHLIQUIDSONORNEARTHISUNIT.
CAUTION: USEOFCONTROLSORADJUSTMENTSORPERFORMANCEOFPROCEDURESOTHERTHANTHOSE
SPECIFIEDMAYRESULTINHAZARDOUSRADIATIONEXPOSURE.
CAUTION: DANGEROFEXPLOSIONIFBATTERYISINCORRECTLYREPLACED.REPLACEONLYWITHTHESAMEOR
EQUIVALENTTYPE.
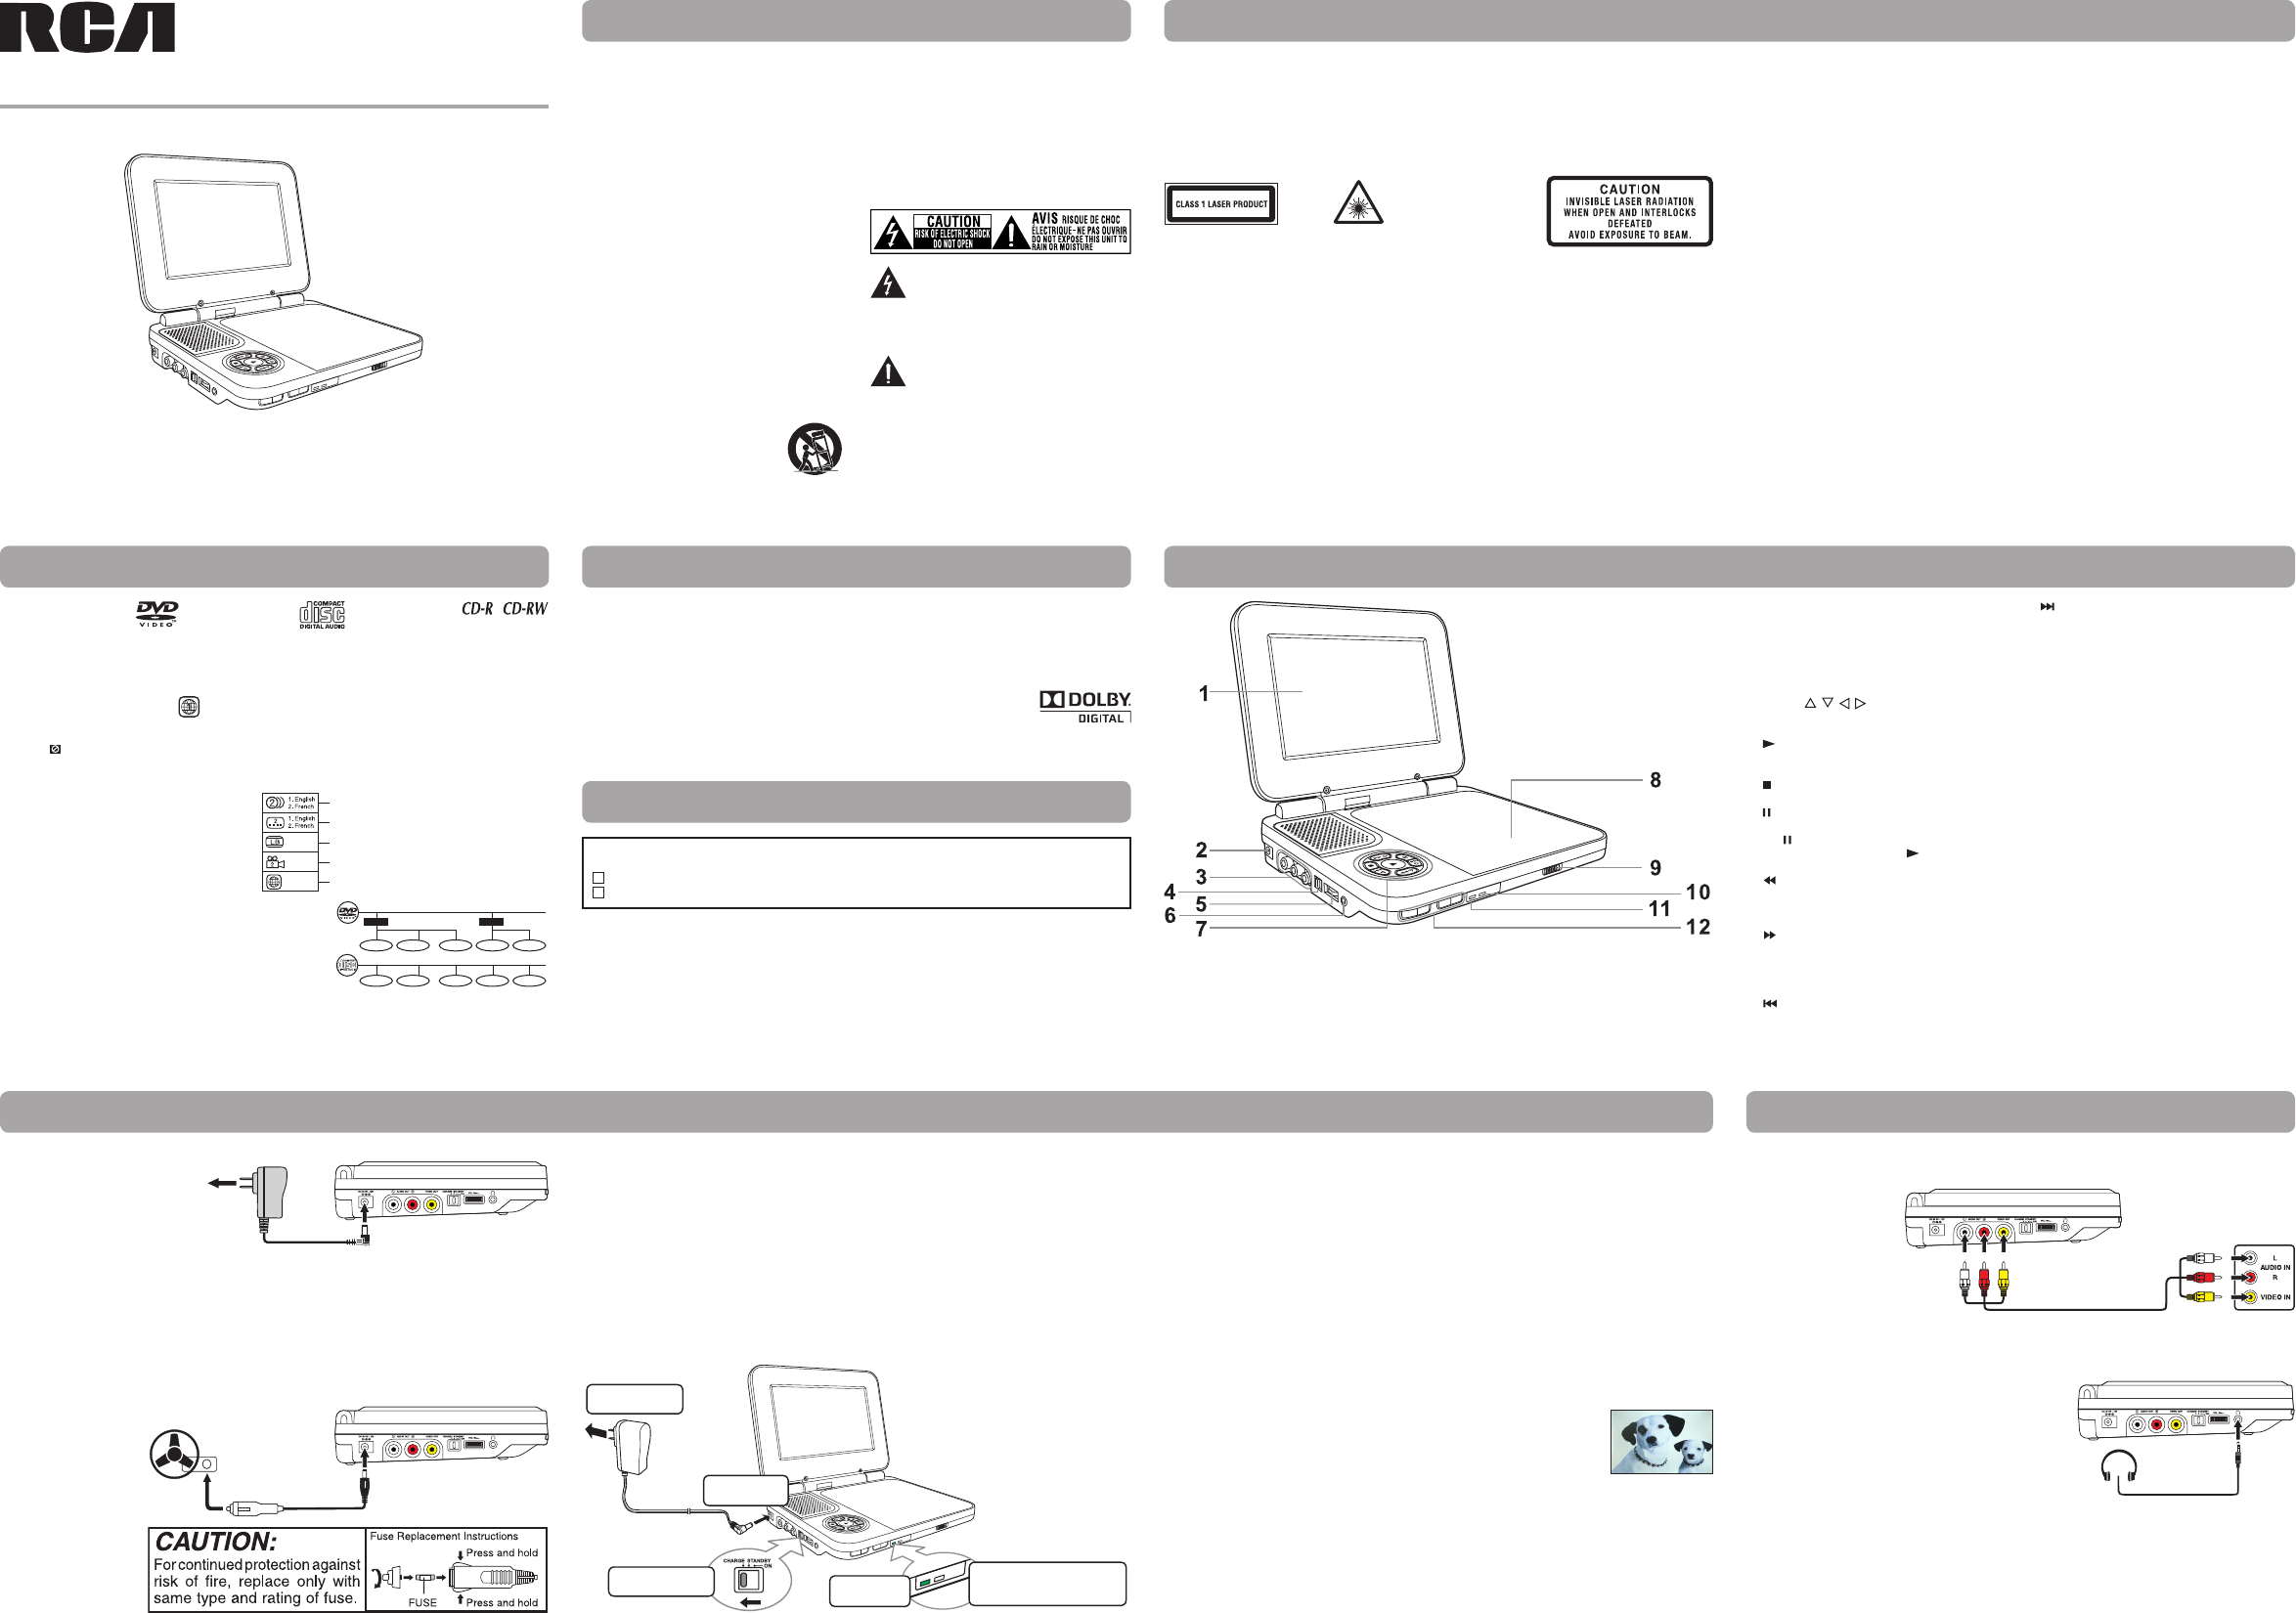
Watching a DVD on your TV
1. Turn on the unit.
2. TurnontheTVandfollowtheinstructionsincludedwithittoplaytheDVD.
A.ConnectingaTV
IfyourTVhasaudio/videoinputs,youcanconnecttheunittoyourTVusingastandardAudio/Videocables.
B. Using headphones/earphones
• Turndownthevolumebeforeconnecting,andthenadjust
the level.
• Whenheadphones/earphonesareconnected,nosoundwill
be emitted from the unit's speaker.
Headphones/Earphones
(3.5mm diameter plug)
Caution:
Avoid listening to sound at levels which may be harmful to your
ears.
To AUDIO / VIDEO OUT jacks
Audio / Video cable
(not included)
TV
White Red Yellow
White Red Yellow
Connections
On placement
• Donotusetheunitinplacesthatareextremelyhot,cold,dusty,orhumid.
• Placetheunitonaatandevensurface.
• Donotrestricttheairowoftheunitbyplacingitinaplacewithpoorairow,bycoveringitwithacloth,
or by placing it on carpeting.
• Toavoidmagnetizing,donotplacetheunitnearspeakersormagnets.
• Donotusethisunitindirectsunlightorleavetheunitinaclosedautomobile(oryacht,etc)whereit
wouldbeexposedtohightemperaturesabove104°F(40°C).
• NonakedamesourcessuchaslightedcandlesshouldbeplacedontheACpoweradapterorthemainunit.
• Theapparatusshouldnotbeexposedtosplashingordrippingliquids,andnoobjectslledwithliquids,
such as vases, should be placed on apparatus.
On safety
• WhenconnectingordisconnectingtheACpoweradapter,griptheplugandnotthecorditself.Pullingthe
cord may damage it and create a hazard.
• Whenyouarenotgoingtousetheunitforalongperiodoftime,disconnecttheACpoweradapter.
On condensation
• Whenleftinaheatedroomwhereitiswarmanddamp,waterdropletsorcondensationmayforminsidethe
unit.Whenthereiscondensationinsidetheunit,theunitmaynotfunctionnormally.Lettheunitstandfor1
to 2 hours before turning the power on, or gradually heat the room and allow the unit to dry before use.
Ventilationwarning
• Donotblocktheventilationopeningsorholes.Iftheventilationopeningsorholesareblockedbya
newspaper or cloth, etc., the heat may not be able to get out.
• Donotoperatetheunitinaconnedspace,suchasabookcaseorbuilt-incabinet.Allowabout4inches
(10cm)offreespaceallaroundtheunitforadequateventilation.
Rating plate location
• Theratingplateislocatedonthebottomofunit.
FCC statements
NOTE:ThisequipmenthasbeentestedandfoundtocomplywiththelimitsforaClassBdigitaldevice,pursuant
to Part 15 of the FCC Rules. These limits are designed to provide reasonable protection against harmful
interferenceinaresidentialinstallation.Thisequipmentgenerates,usesandcanradiateradiofrequencyenergy
and, if not installed and used in accordance with the instructions, may cause harmful interference to radio
communications. However, there is no guarantee that interference will not occur in a particular installation. If
thisequipmentdoescauseharmfulinterferencetoradioortelevisionreception,whichcanbedeterminedby
turningtheequipmentoandon,theuserisencouragedtotrytocorrecttheinterferencebyoneormoreofthe
followingmeasures:
– Reorient or relocate the receiving antenna.
– Increasetheseparationbetweentheequipmentandreceiver.
– Connecttheequipmentintoanoutletonacircuitdierentfromthattowhichthereceiverisconnected.
– Consultthedealeroranexperiencedradio/TVtechnicianforhelp.
Warning:Changesormodicationstothisunitnotexpresslyapprovedbythepartyresponsibleforcompliance
couldvoidtheuser'sauthoritytooperatetheequipment.
Notes on copyright
It is forbidden by law to copy, broadcast, show, broadcast on cable, play in public, or rent copyrighted material
without permission.
Apparatus Claims of U.S. Patent Nos. 6,836,549; 6,381,747; 7,050,698; 6,516,132 and 5,583,936 licensed for limited
viewing uses only.
This product incorporates copyright protection technology that is protected by U.S. patents and other
intellectualpropertyrights.UseofthiscopyrightprotectiontechnologymustbeauthorizedbyMacrovision,and
isintendedforhomeandotherlimitedviewingusesonlyunlessotherwiseauthorizedbyMacrovision.Reverse
engineering or disassembly is prohibited.
Chapter1
Title1 Title2
Chapter2 Chapter3 Chapter1 Chapter2
Track1 Track2 Track3 Track4 Track5
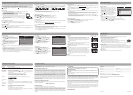
1) LCDscreen
2) DC IN 9V - 12V jack
3) AUDIO / VIDEO OUT jacks
4) CHARGE / STANDBY(power o) / ON switch
5) VOL control
Adjusts the volume.
6) Headphone jack
7) Cursor ( , , , ) buttons
Highlights selections on a menu screen and
adjusts certain settings.
PLAYbutton
Starts or resumes playback of a disc.
Conrms selections on a menu screen.
STOP button
Stops playing a disc.
PAUSEbutton
Pausesplaybackofadisc.Eachtimeyoupress
the PAUSEbuttonthepictureadvancesone
frameonaDVD.Pressthe PLAYbuttonto
resume playback.
SEARCHbutton
PresstoperformfastreverseplaybackonaDVD.
Press and hold to perform fast reverse playback
on an Audio CD.
SEARCHbutton
Press to perform fast forward playback on a
DVD.
Press and hold to perform fast forward playback
on an Audio CD.
PREVbutton
Press to go back to the previous chapters on a
DVD.
Press and hold to skip to the previous tracks/
JPEGpicturesonanAudioCD/JPEGdisc.
NEXTbutton
PresstoadvancechaptersonaDVD.
Pressandholdtoskiptothenexttracks/JPEG
picturesonanAudioCD/JPEGdisc.
8) Disc door
Close tray by pushing the disc door.
9) Open knob
10) Power ON indicator
11) CHARGING indicator
Charge the rechargeable battery before using
it for the first time. The normal charging time
should be completed in approximately 4-5 hours.
The charging light will go out when the battery
becomes fully charged.
12) SETUP button
OpensandclosestheSETUPmenuwhileinstop
mode.
Adjusts Brightness, Panel Display or Contrast of the
LCDscreenwhileinplaybackmode.
AUDIO button
Selects one of the audio sound tracks programmed
onaDVDorselectstheaudiooutputmodeonan
Audio CD.
SUBTITLE button
Selects one of the subtitle languages programmed
onaDVD.
MENU button
OpensandclosestheDVDmenu.
Dolby Digital
DolbyDigitalisatechnologydevelopedbyDolbyLaboratories.SoundtracksencodedinDolbyDigitalcan
reproducefromoneto5.1discretechannelsofexcellentqualityaudio.
The unit automatically recognizes the Dolby Digital bitstream and provides a downmix suitable for two-
channellistening.AnadditionalDolbyDigitaldecoderisrequiredforreproductionofthediscretemulti-channel
soundtracksavailableonmanyDVDs.
ManufacturedunderlicensefromDolbyLaboratories.
Dolbyandthedouble-DsymbolaretrademarksofDolbyLaboratories.
Sound system