


Special offers from our partners!

Find Replacement BBQ Parts for 20,308 Models. Repair your BBQ today.

Built-In Instructions
PLANNING AND DESIGN
Start by identifying the number and size of components you want to include in your outdoor cooking
center. Countertops must be constructed of non-combustible, outdoor-safe materials. Consider outdoor
lighting to illuminate after-dark grilling. For assistance in designing and building your outdoor cooking
center, contact a landscape architect or general contractor. Review the drawings on the following
pages to determine the exact dimensions and items needed for an outdoor cooking center. Keep in
mind that the gas line hook-up is on the right hand side of the main built in-grill. The structure, grill
and support items must be kept level throughout the installation to ensure proper operation.
LOCATION
T
ake into account convenience and visual impact as well as traffic flow, wind exposure, and the site’s
structural suitability. The grill should never be placed in an enclosed area without an approved ventilation
system, or beneath a combustible overhang. Because the grill exhausts to the rear, it should never be
located in front of a window or less than 12” from hard-to-clean surfaces. We recommend keeping
your gas supply lines as short as possible for best performance. To ensure a perfect fit, we strongly
recommend that you have all components on hand prior to final construction.
CLEARANCE TO NON-COMBUSTIBLE CONSTRUCTION
For your safety a minimum of 3” clearance from the back of the grill to non-combustible construction
is required. You should allow at least 6” side clearance to non-combustible construction. The side
vents on this unit can be covered for built in installations without danger of fire or without impairing
the operation of the grill.
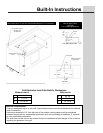
OUTBOARD IGNITER PLATE INSTALLATION (SEE DRAWING ON FOLLOWING PAGE)
The electronic igniters require a standard size deep electrical box, (available at a local hardware
store), with a minimum depth of 2.5” to be mounted in the structure. It should be placed on the left
front or left side of the outdoor cooking center, with the center of the igniter button no more than 3” - 5”
from the grill. The igniter plate (included with the built-in grills) fits over the standard electrical box
once mounted in the structure. (See drawing on following page). If there is a ground wire for the igniter,
it needs to be grounded to a metal structure in order for the igniter to work.
UTILITIES
For natural gas grills, consult your local gas utility company for hook-up requirements. All gas connec-
tions should be made by a certified technician or a gas supply company. For natural gas installation,
the supply line must be at least 1/2” diameter. The rotisserie requires a 110/120 volt electric supply
and GFI receptacle. (6.5 amp min.) that should be installed by a qualified electrical technician. If your
plan includes a sink, arrange for a certified plumbing technician to run a water line to the site.
ELECTRICAL GROUNDING INSTRUCTIONS
The rotisserie kit is equipped with a three-prong (grounding) plug for your protection against shock
hazard and should be plugged directly into a properly grounded three-prong receptacle. Do not cut
or remove the grounding prong from this plug.
The Electrolux Icon Grill can be installed as a built-in grill. If installed
as a built-in grill, the outdoor cooking center
must be constructed of
non-combustible material.