


Special offers from our partners!

Find Replacement BBQ Parts for 20,308 Models. Repair your BBQ today.
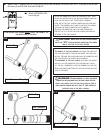
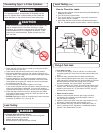
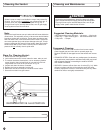
Steps For Cleaning Venturi:
1. Remove burner from grill bottom.
2. Look inside lower end of venturi tubes for nests, webs or mud.
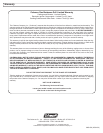
3. To remove the above obstructions, use an accessory flexible
venturi brush or bend a small hook on one end of a 20-inch-
long flexible wire such as the one shown in Fig. 23.
4. Inspect and clean the burner if needed.
5. Replace the burner assembly into the grill.
6. Make sure the valve orifices are inside the venturi tubes.
7. Secure burner back into grill bottom.
22
23
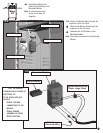
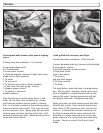
WARNING
Spider’s nests or wasp’s mud inside the venturi may cause fire
at valve. If a fire occurs, immediately
turn off gas supply at L.P.
cylinder valve (see representative illustration in Fig. 22). If
your grill is set up for use with Natural Gas, turn off gas supply
at the system manual shut off valve.
Cleaning the Venturi
Note:
Spiders and small insects can spin webs and build nests inside the
venturi tubes. This especially occurs in late summer and fall before
frost when spiders are most active. These nests can obstruct gas
flow and cause a fire in and around the burner valves. Such a fire
can cause operator injury and serious damage to the grill. To help
prevent a blockage and ensure full heat output, clean and inspect
venturi tubes often (once or twice a month). NOTE: Water or air
pressure will not
normally clear a spider web.
CAUTION
All cleaning and maintenance should be done only when
grill is cool & with the fuel supply turned off at the cylinder.
If your grill is set up for use with Natural Gas, turn off gas
supply at the system manual shut off valve.
Cleaning and Maintenance
Suggested Cleaning Materials:
• Mild dishwashing liquid detergent • Hot water • Wire brush
• Paper clip • Nylon cleaning pad • Soft brass-bristled brush
• Putty knife • Scraper
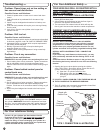
Component Cleaning:
• BURNER: Wire-brush loose corrosion from burner exterior.
Clean clogged gas port holes with an opened paper clip.
Replace corroded or damaged burners that would emit excess
gas.
• STAINLESS STEEL: Clean with any multipurpose (low abrasive,
no phosphorous) metal polish or stainless steel polish and a soft
cloth to prevent marring or scratching the surface. NEVER
USE OVEN CLEANER!
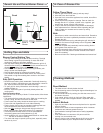
• ORIFICES: Unscrew orifices from rear of valves (Fig. 24). Wash
orifices in solvent and blow air through the small end holes.
Carefully replace the orifices in valve when they are dry. Make
certain that orifices are tightly reassembled.
30
REPRESENTATIVE ILLUSTRATION